
How to Fix Philips Hue Bridge Blinking Third Light
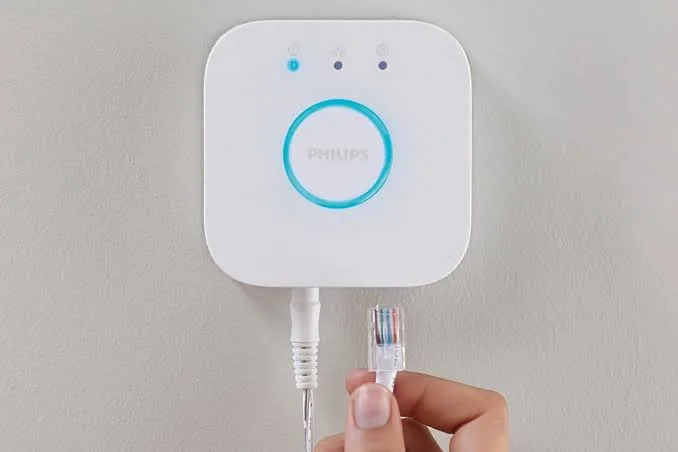
The third indicator light (marked with the Globe / Internet icon) on the Philips Hue Bridge (v2) signals active connectivity to the Philips Hue cloud platform (*.meethue.com). When the first two LEDs are solid blue but the third light is blinking, the Bridge has successfully powered on and acquired a local private IP address via DHCP over Ethernet, but the operating system has failed to establish a secure, outbound TCP/TLS session with Philips Hue portal servers.
This breakdown typically stems from Network Time Protocol (NTP) synchronization failures (preventing TLS certificate validation), upstream DNS lookup timeouts, firewall/SIP inspection dropping outbound persistent sockets (ports 443, 123, or 8883), or Ethernet link auto-negotiation stalls on managed Gigabit switches.
Quick Diagnostic Matrix
| Symptom | Root Cause | Path / Setting | Recommended Fix |
| Lights 1 & 2 solid, Light 3 blinks; local app works | Bridge cannot validate cloud TLS certificates due to blocked NTP time sync | Router Firewall / UDP 123 | Unblock UDP port 123; change primary router DNS to 1.1.1.1 or 8.8.8.8. |
| All lights on except Light 3; out-of-home control dead | Hue backend server outage or deprecated firmware token mismatch | meethue.com / App Settings | Check Philips Hue server status; force an app sync or check for pending bridge updates. |
| Light 3 blinks when plugged into mesh node or switch | 10/100 Mbps auto-negotiation failure or 802.3az Energy Efficient Ethernet (EEE) | Physical Switch Port | Disable EEE on switch port; connect Bridge directly to the primary router LAN port. |
| Light 3 blinks intermittently every few minutes | IP lease collision or short DHCP lease renewal timeouts | Router DHCP Scope | Assign a Static IP / DHCP Reservation for the Hue Bridge’s MAC address. |
| Light 3 blinks after changing ISP or router | Double NAT subnet isolation or Strict ISP DNS filtering blocking Hue endpoints | Router WAN / IPv6 / DNS | Disable router SIP ALG; disable deep packet inspection (DPI); enable pure IPv4 routing. |
1. Verify Cloud Server Availability and Local Control
Before altering router configurations, confirm whether the failure is local to your network or an external infrastructure outage.
[Hue Bridge Front Panel LEDs]
  (1) [Power LED]    ──► Solid Blue  (3.3V/5V DC Rail Healthy)
  (2) [Network LED]  ──► Solid Blue  (Local IP Acquired via DHCP)
  (3) [Internet LED] ──► BLINKING    (Outbound TLS to Cloud Server Blocked)
  (O) [Large Ring]   ──► Solid Blue  (Zigbee 3.0 Mesh Running)
Open the Philips Hue app on your smartphone while connected to the same local Wi-Fi network.
If you can still toggle your bulbs on and off, the Bridge’s internal Zigbee coordinator and local IP stack are functional. The issue is strictly isolated to the outbound WAN bridge daemon.
Check the official Philips Hue status page or social media feeds (@tweethue) to confirm that the Hue Portal API is not undergoing scheduled maintenance or experiencing regional AWS outages.
If local control fails as well, verify that your smartphone has not switched to cellular data or an isolated guest Wi-Fi network on a different VLAN.
2. Cold Power-Cycle the Network Stack (Clear ARP/Routing Tables)
A stale Address Resolution Protocol (ARP) table or an orphaned NAT tracking table in your gateway will block the persistent WebSocket connection the Bridge requires. Rebooting devices in sequence forces a clean routing table rebuild.
[Cold Boot Sequencing]
 1. Unplug Modem, Router, and Hue Bridge from wall power
 2. Power on Modem ──────────────► Wait 2 minutes for stable WAN sync
 3. Power on Primary Router ─────► Wait 2 minutes for DHCP pool initialization
 4. Power on Philips Hue Bridge ─► Allow 3 minutes for full LED sequence
Unplug the power adapters for your Modem, your Primary Router (and any mesh access points), and the Philips Hue Bridge.
Wait 60 seconds to allow residual capacitance to drain from the circuitry.
Plug in your Modem first and wait until all upstream/downstream and internet connection lights stabilize.
Plug in your Primary Router and wait two minutes for it to broadcast SSIDs and establish its internal routing tables.
Plug the Hue Bridge back in. Watch the three LEDs boot sequentially from left to right.
3. Change Router DNS to Public Resolvers (Fixing Domain Timeouts)
Many Internet Service Provider (ISP) DNS servers fail to resolve or throttle secondary CDN domains used by Signify/Philips (such as ws.meethue.com or diagnostics.meethue.com). Switching your gateway’s primary DNS resolves lookup failures immediately.
[Router Gateway Configuration]
 └── WAN / Internet Settings > DNS Server
      ├── Primary DNS:   1.1.1.1  (Cloudflare) or 8.8.8.8 (Google)
      └── Secondary DNS: 1.0.0.1  (Cloudflare) or 8.8.4.4 (Google)
Open a browser and log into your primary router’s admin interface (typically
192.168.1.1,192.168.0.1, or10.0.0.1).Navigate to the WAN, Internet, or Network settings tab.
Locate the DNS Settings configuration (often set to Obtain Automatically from ISP).
Change the configuration to Manual or Custom and enter:
Primary DNS:
1.1.1.1(or8.8.8.8)Secondary DNS:
1.0.0.1(or8.8.4.4)
Save the configuration and reboot the router.
Disconnect and reconnect the Ethernet cable on the back of the Hue Bridge to force a fresh DNS lease query.
4. Unblock NTP (UDP 123) and Essential Outbound Ports
The Philips Hue Bridge does not feature an onboard battery-backed Real-Time Clock (RTC). When powered on, it must query a public Network Time Protocol (NTP) server over UDP port 123 to set its system clock.
If your router, firewall, or parental control software blocks UDP 123, the Bridge’s internal clock defaults to an epoch date (e.g., year 1970 or 2000). When the Bridge subsequently attempts to open a secure HTTPS/TLS handshake with meethue.com, the connection is immediately terminated because the cloud server’s SSL certificates appear expired or not yet valid.
[Hue Bridge Outbound Communication Path]
 ├── Port 53 (UDP/TCP)  ──► DNS Resolution
 ├── Port 123 (UDP)     ──► NTP Time Sync  <── (If blocked, TLS handshake fails)
 ├── Port 80 (TCP)      ──► HTTP Diagnostics
 ├── Port 443 (TCP)     ──► HTTPS / TLS Cloud Control
 └── Port 8883 (TCP)    ──► Secure MQTT Telemetry
In your router’s administration portal, navigate to Security, Firewall, or Access Control.
Verify that UDP Port 123 is not blocked by custom firewall rules or outbound filtering profiles.
Verify that outbound traffic on TCP Ports 80, 443, and 8883 is open and unrestricted.
Disable SIP ALG and Deep Packet Inspection (DPI): Under your router’s advanced firewall or NAT options, locate SIP ALG (Application Layer Gateway) and toggle it to Disabled. Some router firmware mistakenly identifies persistent Hue MQTT/XMPP keepalive packets as VoIP anomalies and terminates the stateful connection.
Check Parental Controls: Ensure the Hue Bridge’s MAC address is completely excluded from any content filters, Trend Micro Home Network Security rules, or scheduled bedtime access cutoffs.
5. Eliminate Switch Link Negotation & Mesh Subnet Traps
The Philips Hue Bridge v2 uses a 10/100 Mbps Fast Ethernet PHY chip. Many modern unmanaged or managed multi-gigabit switches (2.5 GbE / 10 GbE) fail to auto-negotiate properly with legacy 100 Mbps interfaces, causing high packet drop rates that allow local ping responses (keeping Light 2 solid) while dropping large outbound SSL handshake payloads (causing Light 3 to blink).
[Incorrect: Double NAT / Subnet Isolation]
 Modem/ONT ──► ISP Router (Subnet A: 192.168.1.x)
                     │
                     └──► Mesh Node (Subnet B: 192.168.68.x) ──► Hue Bridge (BLOCKED)

[Correct: Flat Physical Topology]
 Modem/ONT ──► Primary Router ──► [LAN Port 1] ──► Hue Bridge (DIRECT CONNECTION)
Bypass Intermediate Switches: Disconnect the Bridge from any unmanaged desktop switches, powerline Ethernet adapters, or Wi-Fi range extender ports. Plug it directly into an open yellow LAN port on the primary router.
Disable Green Ethernet (802.3az): If using a smart/managed switch, log into the switch management dashboard and disable EEE (Energy Efficient Ethernet) or Green Ethernet on the port servicing the Bridge. The power-saving sleep pulses on these ports can drop the low-bandwidth Hue keepalive signal.
Avoid Secondary Mesh Nodes: If using an Eero, Google Nest Wifi, TP-Link Deco, or Netgear Orbi mesh setup, do not plug the Bridge into a wireless satellite node. Always plug the Bridge into the main gateway unit wired directly to your modem to eliminate wireless packet loss and backhaul latency.
Inspect Physical Cable Integrity: Swap out the included Ethernet cable for a certified Cat 5e or Cat 6 patch cord. A broken contact on Pin 4, 5, 7, or 8 may sustain low-speed links while failing full-duplex communication.
6. Configure a Static DHCP IP Reservation
Dynamic IP reallocations can cause the router to assign an IP address already cached in another device’s ARP table, creating an IP conflict that drops WAN routing for the Bridge.
In your router settings, navigate to the LAN Setup or DHCP Server section.
Locate the Address Reservation or Static Lease table.
Find your Philips Hue Bridge in the connected client list (look for hostname
Philips-Hueor the MAC address printed on the barcode sticker underneath the Bridge).Click Add to reserve its current IP address permanently.
Save the configuration and restart the Hue Bridge by pulling the power plug, waiting 10 seconds, and reconnecting it.
7. Factory Reset the Hue Bridge (Last Resort)
If your network, DNS, and NTP configurations are verified functional, the internal non-volatile flash memory (EEPROM) on the Bridge may contain a corrupted security token or damaged cloud certificate binding.
Warning: A factory reset wipes all configured rooms, zones, automations, and paired Zigbee accessories. You will need to re-pair your bulbs and reconfigure your smart home ecosystem from scratch.
[Underside of Philips Hue Bridge]
 ┌──────────────────────────────────────┐
 │ [MAC Barcode]       [RESTORE FACTORY]│
 │                      ┌───┐           │
 │                      │ O │ <── Depress pinhole for 5 full seconds
 │                      └───┘           │
 └──────────────────────────────────────┘
Leave the Bridge powered on with its Ethernet cable connected.
Turn the Bridge upside down to locate the small hole labeled Restore Factory Settings.
Insert an unfolded paperclip or SIM eject tool into the pinhole.
Press and hold the button down for 5 full seconds.
The status LEDs on the front will begin blinking rapidly.
Release the pinhole button and leave the unit undisturbed for 3 to 5 minutes while it erases its partition, reboots, and performs an initial self-diagnostic.
Open the Philips Hue app, select Set up new bridge, and complete the initial pairing wizard.
If the third light continues to blink indefinitely after a full factory reset, a direct connection to the primary router, and verification that outbound UDP 123 and TCP 443 are fully accessible, the hardware’s internal cryptographic security chip (which authenticates the Bridge’s unique hardware identifier against Philips’ Amazon Web Services broker) has suffered a permanent hardware failure, requiring a warranty unit replacement.