
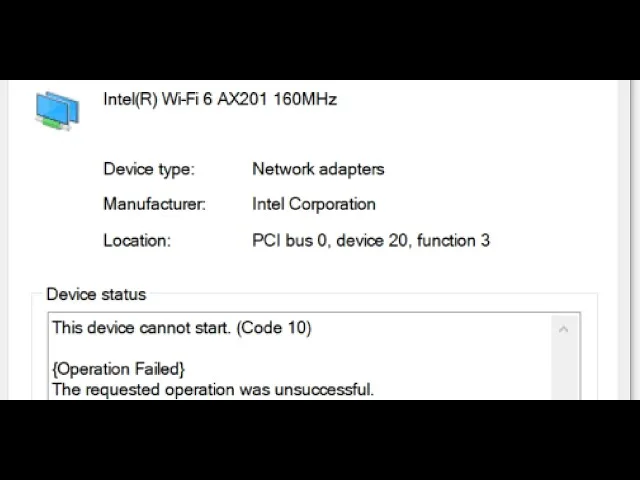
How to Fix Intel Wi-Fi 6 AX201 Error Code 10
Device Manager reports Error Code 10 (“This device cannot start”) on the Intel Wi-Fi 6 AX201 when the Windows kernel fails to initialize communication across Intel’s proprietary Integrated Connectivity (CNVi) interface. Unlike discrete PCIe network cards, the AX201 is a Companion RF (CRF) module that offloads the Wi-Fi MAC layer directly into the Intel CPU and chipset; if residual capacitive “flea power” locks the hardware registers or if ACPI low-power states desynchronize the Netwtw10.sys driver stack during wake cycles, the CNVio2 bus drops the radio link entirely.
Quick Diagnostic Matrix
| Symptom | Root Cause | Setting / Path / Tool | Recommended Fix |
| Yellow exclamation mark after waking from sleep or boot | Modern Standby (S0ix) traps the CNVi controller in a non-responsive ACPI D3hot power state | powercfg.cpl | Discharge motherboard flea power (60-second power hold) and disable Fast Startup. |
| Code 10 appears immediately after a Windows Update | Microsoft Update pushed an incompatible or generic Netwtw10.sys binary | devmgmt.msc | Perform a clean, offline driver sweep and install the latest Intel PROSet/Wireless package. |
| Code 10 toggles with Code 43 or Bluetooth vanishes | Chipset/PCH communication failure via the Intel Management Engine (ME) interface | OEM Support / BIOS | Flash the latest motherboard BIOS and update the Intel Management Engine Corporate/Consumer driver. |
| Device vanishes from Device Manager entirely | Flea power saturation in decoupling capacitors or oxidation on M.2 CNVio2 pins | Motherboard PCB / EC Reset | Execute an Embedded Controller (EC) hard reset; reseat the physical M.2 module. |
1. Discharge Motherboard Flea Power (60-Second Hard Reset)
Because the Intel AX201 relies on CNVi architecture, the MAC portion of your Wi-Fi lives inside the processor/chipset, which remains powered by low-voltage standby rails even when the computer is turned off. If a transient voltage spike or bad state occurs, the controller locks up and will ignore OS initialization commands until power is completely cut to the motherboard’s decoupling capacitors.
For Laptops:
- Disconnect the AC power adapter and unplug all USB peripherals.
- If your laptop has a removable battery, remove it. (For internal batteries, leave the chassis closed).
- Press and hold the physical Power button for a full 60 seconds.
- Why this matters: Holding the button forces the Embedded Controller (EC) to reset and bleeds the residual electrical charge (“flea power”) out of the board’s capacitors, clearing the volatile CNVi register cache.
- Plug the AC adapter back in (do not connect docks or hubs yet).
- Power on the system. Check
devmgmt.mscto see if the yellow warning flag has cleared.
For Desktops:
- Shut down the PC, turn the power supply switch to O (Off), and unplug the wall cord.
- Press and hold the chassis power button for 30 seconds.
- Plug the power cord directly into the wall, switch the PSU on, and boot into Windows.
2. Disable Windows Fast Startup and PCIe Power Savings
Windows Fast Startup saves the kernel session and driver memory states to
hiberfil.sys instead of performing a clean shutdown. When reloaded, the cached state often fails to re-arm the AX201’s CNVio2 bus, producing Error Code 10.- Press
Windows Key + R, typepowercfg.cpl, and press Enter. - In the left-hand column, click Choose what the power buttons do.
- Click the administrative link: Change settings that are currently unavailable.
- Scroll down to Shutdown settings and uncheck the box for Turn on fast startup (recommended).
- Click Save changes.
[Control PanelPower Options]
 └── Choose what the power buttons do
      └── Change settings that are currently unavailable
           └── [Uncheck] "Turn on fast startup" > Save changes
- Open Device Manager by pressing
Windows Key + X> Device Manager (or typedevmgmt.msc). - Expand Network adapters, right-click Intel(R) Wi-Fi 6 AX201 160MHz, and select Properties.
- In the Power Management tab, uncheck Allow the computer to turn off this device to save power, then click OK.
3. Perform a Clean Driver Purge and Reinstall (Netwtw10.sys)
Standard driver updates often leave damaged registry keys or cached
.inf files behind. To fix Code 10, you must strip the driver entirely while offline so Windows Update cannot reinstall a broken driver over the top.Step A: Stage the Official Driver
- Download the latest standalone Intel PROSet/Wireless Software package directly from Intel’s official download center or your laptop manufacturer’s support portal.
- Save the installer to your desktop.
Step B: Disconnect and Purge the Active Driver
- Disconnect from all networks (unplug Ethernet and turn on Airplane mode).
- Press
Windows Key + R, typedevmgmt.msc, and press Enter. - Expand Network adapters, right-click Intel(R) Wi-Fi 6 AX201 160MHz, and select Uninstall device.
- In the confirmation dialog, check the box labeled Attempt to remove the driver for this device (or Delete the driver software for this device).
- Click Uninstall.
[Device Manager]
 └── Network adapters
      └── Intel(R) Wi-Fi 6 AX201 160MHz > Right-click > "Uninstall device"
           └── [Check] "Attempt to remove the driver for this device"
- Restart your computer.
- Run the downloaded Intel driver executable installer as administrator.
- Restart your computer once more to allow the operating system to bind
Netwtw10.syscleanly to the refreshed hardware ID.
4. Reset the Windows Network Stack and Sockets
Stale Winsock catalog entries or corrupted IP routing tables can cause Windows to reject hardware initialization signals during the network adapter handshake.
- Press the Windows Key, type
cmd, right-click Command Prompt, and select Run as administrator. - Run the following commands in exact order, pressing Enter after each:DOS
netsh winsock reset netsh int ip reset ipconfig /flushdns - Restart your PC to commit the network subsystem rebuild.
5. Update Intel Management Engine (ME) and Motherboard BIOS
Because the AX201 relies on CNVi architecture, the host platform’s low-level firmware directly impacts the wireless radio. The CNVio2 interface routes through the Platform Controller Hub (PCH), which is governed by the Intel Management Engine (Intel ME).
- Check your PC/motherboard manufacturer’s website (Dell, Lenovo, HP, ASUS, MSI) for your specific device model.
- Download and install the latest BIOS update. Motherboard vendors frequently issue microcode patches specifically addressing S0ix sleep-state recovery and CNVi link timing issues.
- Download and install the latest Intel Management Engine Interface (MEI) Driver and Firmware. An outdated ME subsystem will fail to authenticate the hardware cryptographic handshake on boot, leaving the AX201 in a Code 10 dead state.
6. Inspect Physical Seating (M.2 Key E / CNVio2)
If the software steps fail to clear the error, the issue is mechanical. While traditional PCIe Wi-Fi cards use M.2 Key A or E, the AX201 uses a specialized pin assignment specifically for CNVio2.
- Power down your system, disconnect all power sources, and open the access panel to reach the M.2 Wi-Fi card.
- Carefully unsnap the main and auxiliary antenna cables (labeled
1and2). - Unscrew the single retaining screw and pull the AX201 card out of its slot at a 30-degree angle.
- Inspect the gold trace pins for dust, thermal pad oil, or corrosion. Clean the pins gently using a lint-free swab dipped in 99% isopropyl alcohol (IPA).
- Re-seat the card firmly into the slot, secure the screw, and snap the antenna leads back onto the micro-coaxial connectors until they click.
If the AX201 continues to show Code 10 across both Windows and a clean bootable Linux live environment (such as an Ubuntu live USB), the RF frontend on the card or the CPU’s internal Wi-Fi MAC has suffered an irreversible silicon failure. When replacing this card, keep its architecture in mind: you cannot swap an AX201 with a standard PCIe-based Intel AX200 unless your motherboard’s M.2 slot explicitly supports both PCIe and CNVi protocols. If your system is locked to CNVi, you must replace it with another CNVi module (such as the Intel AX201 or AX211, depending on your CPU generation).