
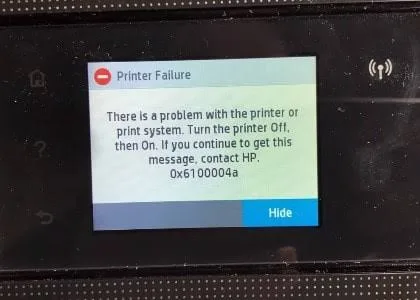
How to Fix HP Printer Failure Error 0x6100004a
HP printer failure error code 0x6100004a occurs when the main logic board detects an unexpected electrical current spike on the DC carriage drive motor or loses positional tracking from the optical encoder strip, signaling that the printhead carriage is physically stalled, caught on the ink purge service station, or blinded by aerosolized ink residue. While HP control panels report this generically as a “Printer Failure” or “Ink System Failure,” resolving the halt requires clearing mechanical gear locks, cleaning the optical timing array, or purging stale hardware fault registers from non-volatile memory.
Quick Diagnostic Matrix
| Symptom | Root Cause | Inspection Point / Path | Recommended Fix |
| Carriage stuck on right side; gears click/grind | Purge service station wiper blade or capping sled locked in the up position | Right maintenance station bay | Manually rotate drive gears to lower capping station; free the mechanical carriage latch. |
| Error trips instantly at power-on before motor spins | Optical encoder strip smudged with ink mist or slipped out of carriage reader | Clear plastic strip behind rail | Clean strip using a dry microfiber cloth; ensure strip sits inside the optical sensor slot. |
| Carriage stops midway across the track during print | Torn paper scraps, packaging tape, or dry ink crust blocking slider bushings | Main carriage rail & rear path | Inspect carriage path with a direct light; clean and lubricate steel guide rail. |
| Error returns after full mechanical verification | Oxidized cartridge contact pads or persistent fault flags locked in NVRAM | Cartridge bay / Engineering Menu | Clean copper contacts with 99% IPA; perform a hardware Semi-Full Reset. |
1. Clear Carriage Path and Lubricate Guide Rods
If the carriage drive motor encounters resistance above its calibrated threshold, the firmware triggers an emergency stop to prevent motor burnout.
Power on the printer and wait for it to enter idle mode.
While the printer is powered on, disconnect the power cord directly from the rear of the unit. (Unplugging during an active power state disengages the mechanical carriage lock, allowing free manual travel).
Open the front and top cartridge access doors.
Using a flashlight, inspect the full width of the horizontal steel carriage rod. Look for small torn paper fragments, dropped pen caps, staples, or loose protective shipping tape.
Gently push the carriage assembly with your hand from the far left to the far right.
If you feel resistance, locate the obstruction beneath or behind the printhead.
Clean the steel guide rod with a dry lint-free cloth to remove dried ink and old grease.
Apply two drops of synthetic PTFE oil (or light mechanical lubricant) to the top of the rod and slide the carriage back and forth by hand to spread it evenly. Never use WD-40 or silicone sprays, as they degrade plastic bushings.
[Cartridge Access Door Open]
 └── Disconnect Rear AC Cable (Disengages Drive Brake)
      └── Inspect Steel Carriage Rail
           ├── Sweep Carriage Left-to-Right Manually
           └── Clear Paper Shreds / Apply PTFE Lubricant
2. Clean and Reseat the Optical Encoder Strip
The encoder strip is a clear, flexible plastic ribbon suspended behind the carriage rail, printed with thousands of microscopic vertical positioning hash marks. If ink aerosol fogs this strip, the carriage’s optical transmissive sensor cannot count position ticks, immediately throwing code 0x6100004a.
Keep the printer powered off and unplugged.
Locate the narrow, semi-transparent plastic strip running parallel to and slightly above the steel slider rod.
Inspect the strip:
Positioning: Ensure the strip is suspended straight and threaded through the tiny optical sensor slot on the rear of the moving carriage.
Cleanliness: Check for black ink smudges, fingerprints, or white grease flung from the drive gears.
Take a dry, lint-free microfiber cloth or optical lens wipe.
Lightly pinch the strip between your thumb and index finger using the cloth, and gently wipe along its length from one side to the other.
Caution: Do not pull or apply downward force. The strip is held under light spring tension at the left bracket and can easily dislodge or snap.
Let the strip dry completely before reconnecting power.
3. Clear Jams in the Purge Service Station
On the far-right side of the chassis sits the ink service station, containing the rubber capping cups, waste-ink sponges, and mechanical wiper blades. If dried waste ink glues the capping sled or wiper mechanism in the upright position, the carriage cannot park or unlock, locking the printer in an error state.
Unplug the printer and slide the carriage manually to the far-left side.
Shine a bright light down into the right-side service cavity.
Inspect the rubber wiper blades and capping mechanism:
If thick, tar-like ink deposits have collected around the rubber seals, damp a cotton swab with distilled water and gently clean the rubber edges and guide tracks.
Inspect the white plastic drive gears behind the service station:
Use a non-conductive wooden probe or gloved finger to gently rotate the drive gears forward.
The purge mechanism should cycle down and sink lower into the chassis floor, releasing any physical latches holding the carriage locked.
Manually roll the carriage back to the far right to confirm that it nests into the service bay without hitting a mechanical wall.
4. Clean Ink Cartridges and Printhead Contacts
Oxidation, spilled ink, or manufacturing flux on the copper contacts creates high electrical resistance, triggering printhead diagnostic trip codes that mimic mechanical carriage stalls.
[Printhead Bay]
 └── Unlatch / Remove Cartridges (CYMK)
      └── Lift Printhead Latch Handle (If Removable)
           ├── Clean Gold Cartridge Pads (99% IPA)
           └── Clean Spring Pins Inside Carriage Bay
Open the cartridge access door and remove all ink cartridges from the carriage.
If your model features a latch handle on the carriage (e.g., HP OfficeJet Pro 8600/8700 series), raise the lever and pull the entire modular printhead assembly straight out.
Inspect the gold-plated contact pads on both the cartridges and the back wall of the carriage slot.
Lightly moisten a lint-free swab with 99% isopropyl alcohol (avoid tap water, which contains conductive minerals).
Thoroughly scrub the copper contact points to remove ink film and corrosion.
Allow the contacts to air-dry for 5 minutes.
Reinsert the printhead, lock the latch firmly downward, re-seat each ink cartridge until it clicks into place, and close the access door.
5. Discharge Flea Power with a Cold Power Reset
HP printer logic boards hold error states in volatile SRAM backed by internal filter capacitors. Simply turning the unit off and on via the front panel leaves residual “flea power” in the motherboard, causing the hardware controller to re-read the stalled flag during reboot.
Turn the printer on (if it is not already powered).
While the printer is powered on and displaying the error, pull the power cord directly from the rear of the machine.
Unplug the other end of the power cord from the wall outlet or surge protector.
Press and hold the physical Power button on the printer’s chassis for 30 seconds while completely disconnected. This bleeds residual voltage from the power supply module and clears temporary hardware fault registers.
Wait 2 full minutes.
Plug the power cord directly into a dedicated wall outlet (bypass power strips or surge protectors, which can cause micro-voltage drops during motor startup).
Reconnect the cable to the printer and power the machine on.
6. Perform a Semi-Full Engineering Reset
If physical paths are clean and the error persists upon boot, the printer’s embedded firmware has locked the carriage status in its system configuration table. A Semi-Full Reset wipes non-volatile memory (NVRAM), re-initializes all hardware sensors, and forces the printer through an out-of-box calibration routine.
Method A: Touchscreen Keypad (OfficeJet Pro Series)
Turn the printer off. Wait 10 seconds.
Turn the printer on. As soon as the screen illuminates, tap the Back arrow (↩) button 4 times in rapid succession (even if the icon is unlit).
If successful, the screen enters the blue Support Menu.
Tap or navigate to the Resets Menu.
Scroll down and select Semi-Full Reset.
The printer will immediately power off. Wait 30 seconds, then power the printer back on. It will run through the initial factory startup sequence and recalibrate carriage travel limits.
[Power On]
 └── Tap 'Back' (↩) 4 Times Rapidly
      └── Support Menu
           └── Resets Menu
                └── [Select] "Semi-Full Reset"
Method B: Physical Button Combination (DeskJet & ENVY Series)
Unplug the printer power cable from the back.
Press and hold both the Power button and the Cancel (X) button simultaneously.
While continuing to hold both buttons, reconnect the power cord.
Keep holding the buttons down for 15 seconds until the carriage shifts or the display lights cycle, then release.
If error code 0x6100004a persists after a successful Semi-Full Reset, the fault is hardware-isolated. The issue indicates a stripped service station drive gear, a broken teeth segment on the carriage drive belt, or an open-circuit failure inside the DC carriage motor’s internal armature windings, requiring mechanical gear replacement or depot-level board repair.