
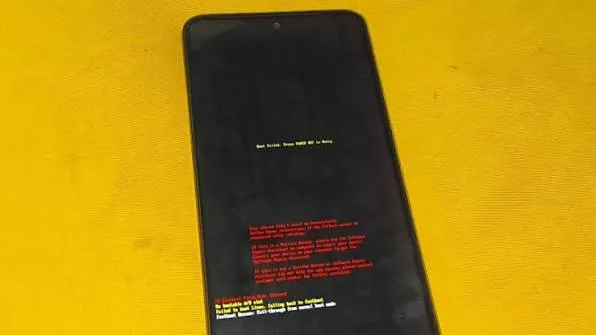
How to Fix Boot Failed Press Power Key To Retry Motorola
The “Boot failed: Press power key to retry” error on a Motorola smartphone indicates that the primary bootloader (Aboot/XBL) or Android Verified Boot (AVB) sequence has encountered an integrity failure while attempting to mount and execute the boot image. When the bootloader queries the active partition table, it validates cryptographic signatures across critical low-level partitions (
boot, init_boot, dtbo, vendor_boot, and vbmeta). If signature verification fails, an unreadable bad block is detected on the internal UFS/eMMC flash storage, or the active A/B slot was corrupted by an interrupted Over-The-Air (OTA) update, the device halts the kernel boot sequence to prevent loading an unstable system.Quick Diagnostic Matrix
| Fastboot Reason / Screen State | Root Cause | Primary Diagnostic | Recommended Fix |
| “Boot failed” loop, device reboots after pressing Power | Corrupted active OS partition slot following an interrupted OTA update | Connect via PC USB (fastboot getvar current-slot) | Switch active slot (fastboot --set-active=a/b) to restore the previous working build. |
| “Failed to boot Linux” / Dead Android with “No command” | Corrupted /userdata filesystem cache or damaged SQLite database | Recovery Mode Menu | Enter stock Recovery Mode, bypass the “No command” screen, and execute Wipe data/factory reset. |
| Fastboot screen opens automatically with “Fastboot Reason: Fall-through” | AVB (Android Verified Boot) hash mismatch on vbmeta or boot partition | Fastboot status line | Reflash official signed stock firmware using the Motorola Rescue and Smart Assistant (RSA). |
| Error triggers instantly upon vibrating; screen cuts off | Cold battery voltage collapse under the high CPU current draw of bootup | Multimeter / Inline USB Meter | Charge with an authentic high-wattage Motorola TurboPower adapter for 30 minutes; inspect battery rail. |
| Flashing firmware fails with “Preflash validation failed” | Downgrade protection (Rollback index) or failing eMMC/UFS storage controller | Fastboot terminal output | Flash matching or newer firmware build; if persistent across XML flashes, storage hardware is dead. |
1. Clear Filesystem Corruption via Motorola Stock Recovery
If the failure is caused by corrupted user app caches, dirty partition bits, or an encryption key synchronization failure after an update, executing a factory wipe clears the damaged storage sector.
[Fastboot to Stock Recovery Flow]
 1. Hold [Volume Down + Power] ──► AP Fastboot Flash Mode Menu
 2. Use Volume Keys to highlight: "Recovery mode" ──► Press Power
 3. Fallen Android Robot with "No command" appears
 4. Hold [Power], tap [Volume Up] once, release both ──► Android Recovery Menu
 5. Select: "Wipe data/factory reset"
- With the phone showing the error or powered off, press and hold the Volume Down and Power buttons simultaneously for 5–7 seconds until the green robot screen (AP Fastboot Flash Mode) appears.
- Use the Volume Down button to navigate through the menu options until the top text displays Recovery mode (in red or blue text).
- Press the Power button once to select it. The phone will display the Motorola logo, followed by a screen showing a fallen Android robot on its back with the text “No command”.
- Bypass the “No Command” Screen:
- Press and hold down the physical Power button.
- While holding the Power button, tap the Volume Up button once.
- Immediately release both buttons.
- The Android Recovery text menu will now populate.
- Use the Volume buttons to scroll down to Wipe data/factory reset and press the Power button.
- Confirm by selecting Factory data reset.
- Once formatting finishes (confirming “Data wipe complete” in the lower log area), highlight Reboot system now and press the Power button.
2. Switch the Active A/B Partition Slot (Zero-Data-Loss Fix)
Modern Motorola devices utilize Google’s A/B seamless system partition scheme. When an OTA update installs in the background, it writes to the inactive slot (e.g., Slot B) while you use Slot A. Upon reboot, the system switches slots. If the update was incomplete, corrupt, or dropped bytes, Slot B will fail verification and throw the “Boot failed” panic. Reverting to the previous slot often restores the phone instantly without wiping personal data.
[A/B Seamless Update Architecture]
 ┌────────────────────────────────────────────────────────┐
 │ Dual System Layout (UFS / eMMC Storage)                │
 │   ┌──────────────────────────┐  ┌──────────────────┐   │
 │   │ Slot A: Previous System  │  │ Slot B: Failed OTA│   │
 │   │ (Intact OS & Bootloader) │  │ (Corrupted Hash)  │   │
 │   └─────────────┬────────────┘  └──────────────────┘   │
 └─────────────────┼──────────────────────────────────────┘
                   ▲
                   └── fastboot --set-active=a (Restores working system)
- Download the official Google Android Platform-Tools (ADB & Fastboot) on a Windows, macOS, or Linux computer.
- Put your Motorola phone into Fastboot Mode (hold Volume Down + Power from powered-off state).
- Connect the phone directly to the PC using a verified USB-A to USB-C data cable.
- Open a Command Prompt or Terminal inside the platform-tools directory.
- Query the active slot:DOS
fastboot getvar current-slot - The terminal will return either
current-slot: aorcurrent-slot: b. - Switch to the alternate partition slot:
- If the current slot is b, run:DOS
fastboot --set-active=a - If the current slot is a, run:DOS
fastboot --set-active=b
- Reboot the device:DOS
fastboot reboot - If the failure was purely a bad OTA installation, the device will boot into the functional operating system on the alternate slot.
3. Flash Official Firmware via Rescue and Smart Assistant (RSA)
If both partition slots are corrupt or the filesystem table is unreadable, using Motorola’s official diagnostic software is the safest method to restore stock firmware without voiding your warranty or manually dealing with Fastboot script syntax.
[Motorola RSA Flashing Workflow]
 1. Install "Rescue and Smart Assistant (RSA)" on a Windows PC.
 2. Navigate to "Rescue" tab ──► Select "Phone".
 3. Enter Fastboot Mode on device ──► Connect via USB cable.
 4. RSA auto-queries IMEI, Model, and Baseband SKU.
 5. Downloads official signed ROM archive (.zip/.xml).
 6. Click "Rescue Now" ──► Writes clean partition images via Fastboot.
- On a Windows PC, download and install the official Rescue and Smart Assistant (RSA) tool from the Motorola/Lenovo support portal.
- Launch RSA and sign in (or proceed as guest).
- Click the Rescue tab at the top of the interface and select Phone.
- The software will instruct you to connect your device. Put your Motorola phone into AP Fastboot Flash Mode (Volume Down + Power) and plug it into a rear USB 2.0/3.0 port on the PC.
- RSA will query the board serial, model ID, and carrier SKU directly from the bootloader.
- If the phone is not automatically detected: Click the manual selection dropdowns and enter your exact model number (e.g.,
XT2135-1,XT2301-4, found etched on the phone’s back glass, SIM tray, or in the Fastboot menu text).
- Click the Download button to pull the certified, factory-signed stock firmware directly from Motorola’s firmware servers.
- Once the firmware download and MD5 checksum verification complete, click Rescue Now.
- Keep the phone securely connected and do not disconnect the cable while the utility flashes the boot, system, vendor, radio, and super images. Once complete, the phone will restart cleanly into the Android setup wizard.
4. Manual Fastboot Recovery (Advanced Partition Flashing)
If the RSA tool reports that your device is unsupported (common on international dual-SIM models, carrier-unlocked variants, or converted SKUs), flashing the factory firmware image manually over the command line will rebuild the partition tables.
[Critical Fastboot Partition Verification Order]
 ├── fastboot oem fb_mode_set                  (Flags Motorola Flash Mode)
 ├── fastboot flash partition gpt.bin          (Rebuilds Primary Partition Table)
 ├── fastboot flash boot boot.img              (Writes Clean Kernel & Ramdisk)
 ├── fastboot flash init_boot init_boot.img    (For Android 13/14+ devices)
 ├── fastboot flash vbmeta vbmeta.img          (Clears AVB Verification Flags)
 ├── fastboot flash super super.img_sparsechunk.* (Writes Core System Images)
 └── fastboot oem fb_mode_clear                (Exits Flash Mode)
- Download the exact matching factory firmware package for your specific software channel and build number (e.g., from Motorola firmware index archives like Lolinet).
- Extract the firmware ZIP archive directly into your
platform-toolsfolder. - Open the folder containing the fastboot files and locate the file named
flashfile.xmlorservicefile.xml:servicefile.xmlflashes system partitions while preserving user data.flashfile.xmlwipes the entire storage block for a complete factory restoration.
- Execute the critical flashing lines via Command Prompt:DOS
fastboot oem fb_mode_set
fastboot flash partition gpt.bin
fastboot flash bootloader bootloader.img
fastboot flash vbmeta vbmeta.img
fastboot flash vbmeta_system vbmeta_system.img
fastboot flash boot boot.img
fastboot flash dtbo dtbo.img
fastboot erase userdata
fastboot erase cache
fastboot oem fb_mode_clear
fastboot reboot
(Note: Devices running Android 10 and newer split system images intosuper.img_sparsechunkfiles. Run through all sequential sparsechunks included in your specific firmware payload).
5. Hardware Checks: Stuck Switches, Battery Sag, and NAND Wear
If software restores fail to hold or the phone crashes back to “Boot failed” within minutes of a successful flash, physical hardware failures are halting the startup sequence.
[Hardware Troubleshooting Hierarchy]
 ┌────────────────────────────────────────────────────────┐
 │ Inspect Mechanical Power Switch                        │ <── Debris/Dent holding switch down
 ├────────────────────────────────────────────────────────┤
 │ Inspect Battery Terminal Voltage                       │ <── Sub-3.6V sags under boot current
 ├────────────────────────────────────────────────────────┤
 │ Inspect UFS / eMMC Flash Health                        │ <── Preflash Validation / I/O Errors
 └────────────────────────────────────────────────────────┘
- Stuck or Sticky Power Button:
- A dirty, recessed, or mechanically shorted power switch continuously triggers the bootloader reset interrupt, preventing the system from finishing Linux kernel initialization.
- Inspect the physical button. Clean the perimeter of the button using a drop of 99% isopropyl alcohol (IPA) and press it repeatedly to dislodge accumulated pocket grime or internal membrane sticking.
- Battery Voltage Drop Under Boot Load:
- During the transition from the low-power bootloader to the full Android GUI, the processor clocks jump to maximum boost frequencies, demanding an instantaneous current surge ($2text{A}–3text{A}$).
- If the internal lithium-ion pouch cell has high internal resistance, aged chemistry, or a failing protection circuit module (PCM), the rail voltage drops below the power management IC’s (PMIC) minimum operational threshold ($<3.4text{V}$), crashing the bootloader back to the error screen.
- Plug the phone into an authentic Motorola TurboPower charger and let it sit undisturbed for at least 45 minutes before attempting a reboot.
- UFS / eMMC NAND Silicon Degradation:
- Flash memory has a finite number of Program/Erase (P/E) cycles. If critical sectors within the Master Boot Record, partition table, or storage RPMB (Replay Protected Memory Block) have worn out, the drive locks into a read-only state.
- If Fastboot output returns errors such as
Preflash validation failed,cmd: flash: write: failure, orI/O error, the internal flash storage memory controller has degraded. This cannot be corrected with software tools and requires an authorized board-level repair or mainboard replacement.