
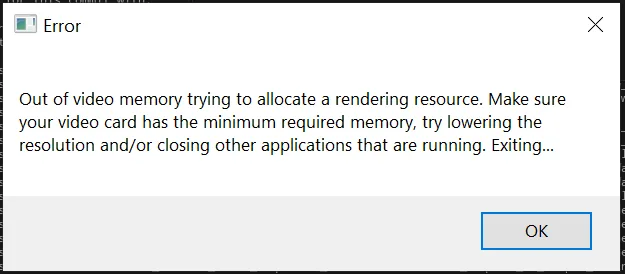
How to Fix Unreal Engine “Out of Video Memory” Error
The “Out of video memory trying to allocate a rendering resource” crash in Unreal Engine (UE4 and UE5) occurs when the engine’s Rendering Hardware Interface (RHI) fails an allocation request through DirectX 12 (ID3D12Device::CreateCommittedResource), DirectX 11, or Vulkan. While this error indicates that the graphics driver rejected a memory allocation block, the breakdown rarely stems solely from running out of physical onboard VRAM.
In modern titles, this crash is frequently triggered by Intel 13th and 14th Gen CPU microcode and voltage instability corrupting Oodle decompression, Windows virtual memory (paging file) starvation preventing shared VRAM spillover, an engine Texture Streaming Pool configured below required asset budgets, or GPU driver crashes resulting in a DXGI_ERROR_DEVICE_REMOVED condition misidentified by the engine as an allocation failure.
Quick Diagnostic Matrix
| Trigger / Context | Underlying Root Cause | Inspection / Diagnostic Tool | Recommended Fix |
| Crashes during “Compiling Shaders” or initial boot (Intel Core i7/i9) | CPU P-core transient voltage shifts corrupting RAD Game Tools Oodle decompression | Event Viewer / Intel XTU | Update motherboard BIOS (Microcode 0x12B); apply Intel Default Settings; drop P-core ratio by 1x–2x. |
| Crashes on game startup or loading screen across any hardware | Windows Paging File (pagefile.sys) disabled, restricted, or disk out of space | sysdm.cpl (Virtual Memory) | Set Windows paging file to System managed or assign a manual 16 GB–32 GB pool. |
| Crashes during gameplay in asset-dense areas on 8 GB / 10 GB GPUs | VRAM saturation compounded by Frame Generation and high-resolution textures | Rivatuner / MSI Afterburner | Disable Frame Generation (saves 1.5–2 GB VRAM); drop texture resolution from Epic to High. |
| Crash occurs exclusively on DirectX 12; game launches on DX11 | D3D12 dynamic memory heap fragmentation or driver-level pipeline stall | Launch Options (-dx11) | Force the application into DirectX 11 mode using -dx11 or -d3d11 launch parameters. |
| Crashes inside the Unreal Engine Editor during project editing | Texture Streaming Pool budget exceeded by high-resolution Nanite/Lumen assets | UE Output Log / Console (~) | Increase streaming budget via r.Streaming.PoolSize or allocate dynamically. |
1. Resolve Intel 13th/14th Gen CPU Oodle Decompression Faults
If you are running an Intel Core i9 (13900K/KF/KS, 14900K/KF/KS) or Core i7 (13700K/KF, 14700K/KF) processor and the crash occurs during “Compiling Shaders”, initial asset decompression, or on the game’s title screen, this is usually an issue with CPU silicon stability rather than GPU memory exhaustion.
[The Oodle Decompression Failure Loop]
 UE Game Boot ──► Unpacks Assets via RAD Oodle Data Compression (Uses AVX2 on CPU)
                         │
                         ▼
           [High P-Core Clock + High Transient Voltage]
                         │
                         ▼
        [Silicon Instability Produces Mathematical Bit-Flip]
                         │
       ┌─────────────────┴─────────────────┐
       ▼                                   ▼
 [Corrupted File Data Extracted]    [Engine Allocates Impossible Memory Size]
       │                                   │
       └─────────────────┬─────────────────┘
                         ▼
 [Crash Throws: "Out of Video Memory Trying to Allocate a Rendering Resource"]
Unreal Engine uses RAD Game Tools’ Oodle Data compression (e.g., Kraken, Leviathan). Decompressing these packages heavily stresses the CPU’s primary performance cores (P-cores) using AVX instructions. When motherboards push unchecked power limits (Multi-Core Enhancement) or excessive single-core turbo boosts, a transient voltage drop triggers a computational calculation error. The decompression routine writes corrupt payload sizes to memory, prompting the engine to request an impossible VRAM allocation that causes an instant crash.
Step A: Update Motherboard BIOS (Apply Intel Default Settings)
Visit your motherboard vendor’s support page (ASUS, MSI, Gigabyte, ASRock) and download the latest BIOS update containing the Intel Microcode updates (0x129 / 0x12B or later).
Flash the BIOS using your board’s UEFI flash utility.
Upon first boot into the BIOS, locate the CPU Power Configuration or Performance Profiles menu.
Set the profile to Intel Baseline or Intel Default Settings (enforces official Intel limits for PL1/PL2, IccMax, and Tau, rather than unlimited motherboard board-power limits).
Step B: Lower P-Core Multipliers via Intel XTU (Immediate Workaround)
If a BIOS update cannot be performed immediately, reducing the core clock will stabilize the execution pipeline:
Download and install Intel Extreme Tuning Utility (Intel XTU).
In the Advanced Tuning tab, locate Performance Core Ratio (P-Core Ratio).
Lower all P-Core multipliers down by 2x (e.g., change from
55xto53x, or57xto55x).Apply the settings.
Launch the game and complete the initial shader compilation pass. Once shaders are compiled and cached to disk, the extreme uncompression load ceases.
[Intel XTU Tuning]
 Performance Core Ratio: [57x] ──► Change to [55x] (or lower by 200 MHz)
 Efficient Core Ratio:   [Leave at Factory Default]
 Core Voltage Offset:    [0.000 V]
2. Reconfigure and Expand the Windows Virtual Memory Paging File
When physical VRAM is saturated, modern graphics APIs (DirectX 12 and Vulkan) spill texture allocations over into Shared GPU Memory, which is backed by system RAM. In turn, Windows balances physical RAM by paging cold application pages into the virtual memory paging file (pagefile.sys). If you have disabled the paging file, capped it to a small fixed value (e.g., 2 GB), or if your storage drive has less than 10 GB of free space, the graphics driver fails the virtual address commit, producing a video memory crash.
[VRAM Spillover Architecture]
 ┌────────────────────────────────────────────────────────┐
 │ Dedicated VRAM (GPU Physical Memory: e.g., 8 GB)       │
 └──────────────────────────┬─────────────────────────────┘
                            │ [VRAM EXHAUSTED]
                            ▼
 ┌────────────────────────────────────────────────────────┐
 │ Shared GPU Memory (System RAM: e.g., 16 GB / 32 GB)    │
 └──────────────────────────┬─────────────────────────────┘
                            │ [RAM STAGES HIGH DEMAND]
                            ▼
 ┌────────────────────────────────────────────────────────┐
 │ Windows Virtual Memory Paging File (pagefile.sys)      │ <── IF BLOCKED:
 └────────────────────────────────────────────────────────┘     ENGINE HALTS
[System Properties (sysdm.cpl)]
 └── Advanced Tab > Performance [Settings] > Advanced Tab > Virtual Memory [Change]
      ├── [UNCHECK] "Automatically manage paging file size for all drives"
      ├── Select your FASTEST SSD (Drive C:)
      ├── Select "Custom size":
      │     ├── Initial size (MB): 16384 (16 GB)
      │     └── Maximum size (MB): 32768 (32 GB)
      └── Click [Set] ──► Click [OK] ──► Restart PC
Press
Windows Key + R, typesysdm.cpl, and hit Enter.Switch to the Advanced tab. Under Performance, click Settings.
In the Performance Options window, go to the Advanced tab and click Change under Virtual memory.
Uncheck Automatically manage paging file size for all drives.
Select your fastest installed drive (an NVMe SSD, typically
C:):Select Custom size.
Set Initial size (MB) to
16384($16text{ GB}$).Set Maximum size (MB) to
32768($32text{ GB}$).(Alternatively, choose System managed size, ensuring the chosen SSD has at least $40text{ GB}$ of free storage capacity).
Click the Set button, click OK, and restart your PC to mount the expanded memory table.
3. Force DirectX 11 Launch Arguments
DirectX 12 offloads low-level memory allocation, synchronization, and resource barrier management directly onto the game engine. If the title’s D3D12 memory allocator contains a leak, forcing the engine to compile its pipeline using DirectX 11 shifts memory management back to the GPU vendor’s display driver, bypassing engine allocation limits.
[Steam Library]
 └── Right-click Game > Properties > General > Launch Options
      └── Enter: -dx11   (or -d3d11)
[Epic Games Launcher]
 └── Settings > Manage Games (Select Game) > [Check] "Additional Command Line Arguments"
      └── Enter: -d3d11
Steam: Right-click the game in your Library > select Properties > navigate to the General tab > scroll down to Launch Options > enter
-dx11(or-d3d11).Epic Games: Open Epic Settings > scroll to the bottom to find the target title > expand it > check Additional Command Line Arguments > enter
-d3d11.Desktop Executables: Right-click the game’s desktop shortcut > select Properties > in the Target field, place your cursor at the very end of the string, add a single space, and append
-dx11.
4. Increase Texture Streaming Pool Budget (For Players and Developers)
Unreal Engine uses a fixed memory pool for streaming mipmaps into memory. If high-resolution asset loading exceeds the configured streaming pool budget, the engine either displays severe texture popping or throws allocation errors.
[Unreal Engine In-Game Console (Press ~ or ' or  Key)]
 ├── r.Streaming.PoolSize 4096            (Expands pool to 4 GB)
 ├── r.Streaming.PoolSize 0               (Disables pool cap; allocates dynamically)
 └── r.Streaming.LimitPoolSizeToVRAM 1    (Restricts pool strictly within hardware limit)
For Unreal Engine Developers:
If the crash occurs within the Unreal Editor while loading levels or rendering cinematics:
Open the project root directory and navigate to:
PlaintextConfig/DefaultEngine.iniOpen
DefaultEngine.iniin a text editor and add (or modify) the following lines under the[/Script/Engine.RendererSettings]category:Ini, TOML[/Script/Engine.RendererSettings] r.Streaming.PoolSize=4096 r.Streaming.UseFixedPoolSize=0 r.Streaming.LimitPoolSizeToVRAM=1Save the file and restart the editor.
For Players (Modifying User Configs):
Press
Windows Key + R, type%localappdata%, and press Enter.Locate the folder matching the game title.
Open
SavedConfigWindowsNoEditor(orWindows).Open
Engine.iniand append the configuration above to the end of the file.
5. Mitigate In-Game VRAM Overheads (Frame Gen, Lumen, & Res)
Certain rendering technologies allocate fixed VRAM frame-buffers upon activation. On graphics cards with 8 GB to 12 GB of VRAM, turning on multiple heavy features concurrently will push the allocation balance past the physical boundary.
[Approximate VRAM Overhead Profile (1440p / 4K Epic)]
 ┌────────────────────────────────────────────────────────┐
 │ Base Game Engine & Meshes:            3.5 GB - 5.0 GB  │
 │ Epic Textures / Materials:            2.5 GB - 4.0 GB  │
 │ Hardware Ray Tracing / Lumen:         1.5 GB - 2.5 GB  │
 │ Frame Generation (DLSS 3 / FSR 3):    1.5 GB - 2.0 GB  │
 ├────────────────────────────────────────────────────────┤
 │ TOTAL DEMAND:                         9.0 GB - 13.5 GB │ <── Crashes 8GB Cards!
 └────────────────────────────────────────────────────────┘
Disable Frame Generation: Frame Generation (NVIDIA DLSS 3 / AMD FSR 3) holds additional frame buffers in dedicated memory to synthesize interpolated frames, instantly consuming $1.5text{ GB}–2.0text{ GB}$ of VRAM. Disabling Frame Generation frees up immediate headroom.
Lower Texture Quality from “Epic/Ultra” to “High”: Texture resolution accounts for the single largest chunk of static VRAM allocation. Shifting one tier down drops texture buffer demands by up to $30text{–}40%$ with minimal perceptible loss in dynamic resolution.
Switch Hardware Ray Tracing / Lumen to Software: In the game settings, change Global Illumination from Hardware Ray Tracing to Software Ray Tracing or Screen Space. Hardware ray tracing structures (BVH – Bounding Volume Hierarchy) must be stored permanently in VRAM, which can quickly crowd out the graphics pipeline.
6. Adjust Graphics Driver TDR Timeouts and Clean Drivers via DDU
When compiling complex compute shaders, the GPU may become momentarily non-responsive while processing deep instruction loops. If the GPU fails to respond to the Windows kernel within 2 seconds, the Timeout Detection and Recovery (TDR) system resets the display driver. Unreal Engine catches this hardware reset, drops the pipeline, and misidentifies it as an allocation crash.
[Registry Editor (regedit)]
 └── HKEY_LOCAL_MACHINESYSTEMCurrentControlSetControlGraphicsDrivers
      ├── New > DWORD (32-bit) Value: "TdrDelay"    = 10 (Decimal)
      └── New > DWORD (32-bit) Value: "TdrDdiDelay" = 10 (Decimal)
Step A: Increase Windows TDR Timeout
Press
Windows Key + R, typeregedit, and hit Enter.Navigate to:
PlaintextHKEY_LOCAL_MACHINESYSTEMCurrentControlSetControlGraphicsDriversRight-click the empty space in the right pane, select New > DWORD (32-bit) Value, and name it:
PlaintextTdrDelayDouble-click
TdrDelay, select Decimal, set the value to10, and click OK (extends the timeout allowance from 2 seconds to 10 seconds).Create a second DWORD (32-bit) Value named:
PlaintextTdrDdiDelaySet its value to
10(Decimal) as well.Close the registry editor and restart your PC.
Step B: Clean Display Driver Sweep (DDU)
Corrupted dynamic link libraries (nvwgf2umx.dll, amdxc64.dll) inside the driver store can drop API allocation tables:
Download Display Driver Uninstaller (DDU) and the latest stable WHQL driver for your GPU.
Boot into Safe Mode (Hold
Shiftwhile selecting Restart in Windows > Troubleshoot > Advanced Options > Startup Settings > Restart > press4).Launch DDU, select your GPU type and manufacturer, and click Clean and restart.
Once Windows boots normally, run the clean driver installer, select Custom Installation, and check Perform a clean installation.
If the Unreal Engine “Out of Video Memory” error occurs solely on a single title right after an over-the-air game patch, inspect the game’s community hubs or issue trackers to verify if the build introduced a broken Nanite mesh streaming leak or an unpatched memory regression. In those situations, running under DirectX 11 (-dx11) or downscaling texture pools remains the primary workaround until the studio issues a hotfix targeting the engine’s root asset allocation buffers.